Chef John's Spooktacular Halloween Recipes
Chef John's Halloween recipes are a real treat! From zombie meatloaf to meringue ghosts, these creations are as disturbingly fun to look at as they are delicious to eat. Get ready to whip up some impressive and irresistibly tasty dishes for an unforgettable Halloween!

PHOTO: Photo by Chef John.
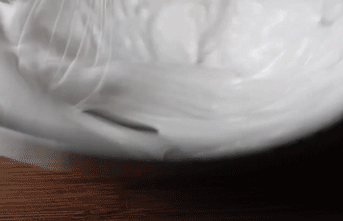
PHOTO: Photo by Chef John.
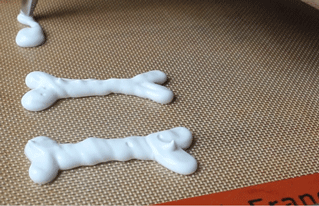
PHOTO: Photo by Chef John.
01 Meringue Bones and Ghosts
As Chef John explains, "While I know no one is ever actually scared by spooky Halloween treats, I do know for a fact that many people are terrified to work with meringue. Hopefully these bones and ghosts will help chase those demons away." Fear not, with Chef John leading the way, you'll end up with a shiny, glossy, light-and-delicious meringue that holds shape perfectly when piped.
Ingredients:
2 large egg whites
2 drops fresh lemon juice, or more to taste
7 tablespoons white sugar, or more to taste
2 chocolate chips, melted, or as needed
Directions:
Step 1:
Preheat oven to 225 degrees F (110 degrees C). Line 2 baking sheets with silicone baking mats.
Step 2:
Whisk eggs whites and lemon juice together in a bowl until thick, white, and foamy. Add sugar a spoonful at a time, whisking constantly, until meringue is shiny, thick, and holds its shape.
Step 3:
Transfer meringue to a piping bag. Pipe 12 bone shapes onto a prepared baking sheet. Pipe 12 puffs to resemble ghosts onto the remaining baking sheet.
Step 4:
Bake in the preheated oven until dried and firm, about 1 hour. Turn off the oven, close the door, and cool until completely dried, about 1 hour more.
Step 5:
Dip the tip of a toothpick into melted chocolate and dot chocolate "eyes" on each of the ghosts.
Tips:
You can substitute 1/8 teaspoon of cream of tartar for the lemon juice if you prefer.
Feel free to use any variety of melted chocolate in place of the semisweet chocolate chips.

PHOTO: Photo by Chef John.
PHOTO: Photo by Chef John.
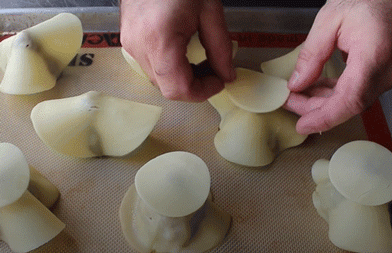
PHOTO: Photo by Chef John.
02 Mini Meatloaf Ghosts
"Transform your favorite meatloaf recipe into these delightfully spooky, yet utterly adorable, edible ghosts," says Chef John. "They're simple and fun to make, and the leftovers make fantastic 'ghost on toast' sandwiches." Check out the video to learn how to shape the ghosts!
Ingredients:
1 pound lean ground beef
1 ½ teaspoons kosher salt
½ teaspoon freshly ground black pepper
1 pinch cayenne pepper
2 tablespoons minced green onions
1 tablespoon chopped fresh parsley, or to taste
⅓ cup plain dry bread crumbs
1 large egg, beaten
1 teaspoon Worcestershire sauce
10 slices provolone cheese
For the blood sauce:
½ cup ketchup
¼ cup barbeque sauce
2 tablespoons Sriracha sauce
Directions:
Step 1:
Combine ground beef, salt, pepper, cayenne, green onions, parsley, bread crumbs, egg, and Worcestershire sauce in a large bowl. Mix with a fork until just combined; do not overmix. Wrap and chill in the refrigerator for 1 hour.
Step 2:
Preheat the oven to 350 degrees F (175 degrees C). Line a sheet pan with a silicone liner (such as Silpat®).
Step 3:
Remove meat from the refrigerator and divide into 8 equal portions. Dampen your fingers with cold water and roll meat into smooth balls. Form each ball into a ghost (or pear) shape and place on the prepared sheet pan; try to center the heads over the bodies.
Step 4:
Bake in the center of the preheated oven until cooked through, about 20 minutes. An instant-read thermometer inserted into the center should read at least 150 degrees F (66 degrees C).
Step 5:
Remove from the oven and immediately place a slice of provolone cheese on the top of each ghost, centering it the best you can. Cut the remaining 2 slices of provolone into quarters and place those over the center to provide more cheese for the head. The residual heat from the meat will start to melt the cheese and it will droop down.
Step 6:
Return to the oven until the cheese melts, 30 to 60 seconds.
Step 7:
Remove from the oven and take some of the melted cheese around the bottoms and wrap and drape it back up over the heads. Use the tip of a knife to form eyes and mouths, then neaten up the bottom of the cheese "sheets."
Step 8:
Combine ketchup, barbecue sauce, and Sriracha for blood sauce; ladle onto plates and serve meatloaf ghosts on top.
Tips:
You’re not limited to this meatloaf recipe for making these ghosts—you can use any meatloaf or meatball recipe, or even just seasoned ground beef.
Chilling the meat mixture in the fridge isn’t essential, but it will make it easier to handle and likely enhance the flavor.
You can substitute fine salt for kosher salt, and feel free to use any type of white melting cheese.
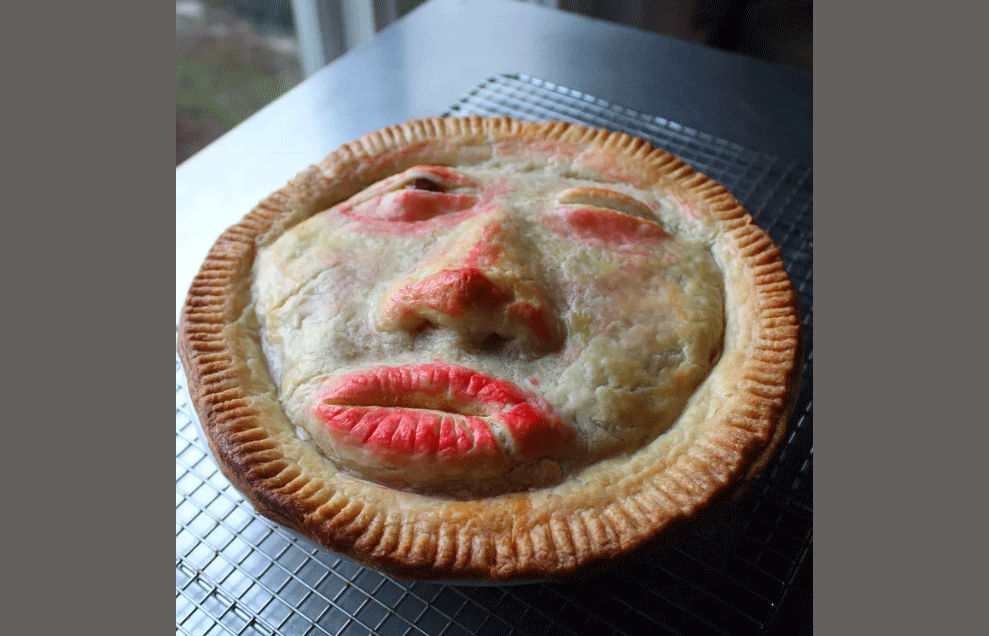
PHOTO: Photo by Chef John.
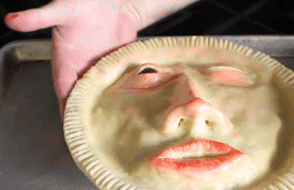
PHOTO: Photo by Chef John.
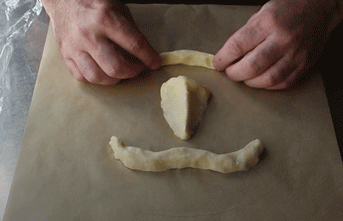
PHOTO: Photo by Chef John.
03 Chef John's Face Pie
Welcome to the savory side of horror! This recipe transforms Chef John's classic, mild-mannered French-Canadian meat pie—made with ground beef, pork, potatoes, and spices—into a truly terrifying creation! "A few months ago, I came across a pie on Twitter so creepy and unsettling that I wondered if it was too frightening to share as a video," Chef John reveals. Discover how he brings this chilling dish to life… if you dare!
Ingredients
Crust:
3 cups all-purpose flour
1 teaspoon kosher salt
2 sticks unsalted butter, sliced, frozen
2 teaspoons distilled white vinegar
7 tablespoons ice cold water
Spice Blend:
2 teaspoons kosher salt
1 teaspoon freshly ground black pepper
1 teaspoon dried thyme
½ teaspoon dried sage
½ teaspoon ground cinnamon
½ teaspoon ground ginger
¼ teaspoon freshly grated nutmeg
¼ teaspoon ground allspice
¼ teaspoon ground mustard
⅛ teaspoon ground cloves
1 pinch cayenne pepper
Filling:
1 large russet potato, peeled and quartered
1 teaspoon kosher salt
1 tablespoon butter
1 large onion, finely chopped
1 pinch salt
4 cloves garlic, crushed
½ cup finely diced celery
1 pound ground beef
1 pound ground pork
Egg Wash:
1 large egg
1 tablespoon water
½ grape
2 drops red food coloring, or as needed
Directions:
Step 1:
Place flour, salt, and frozen butter slices in the bowl of a food processor. Pulse on and off until butter is about the size of peas, about 30 seconds. Stir vinegar into water; drizzle over the flour mixture. Pulse on and off until mixture is crumbly and holds together when you pinch a piece off, about 10 seconds. Drizzle in another teaspoon of water if dough can't be pressed together.
Step 2:
Transfer mixture to a work surface. Press it together into a ball. Wrap in plastic wrap. Refrigerate until chilled, at least 1 hour.
Step 3:
Mix salt, pepper, thyme, sage, cinnamon, ginger, nutmeg, allspice, mustard, cloves, and cayenne together in a small bowl.
Step 4:
Place potato quarters in a saucepan; cover with cold water. Add 1 teaspoon kosher salt. Bring to a boil over high heat; reduce heat. Simmer until cooked through, 10 to 15 minutes. Scoop out potatoes and transfer to a bowl; save cooking liquid. Mash potatoes with a potato masher while still hot.
Step 5:
Melt butter in a skillet over medium heat. Add chopped onion and a pinch of salt. Cook and stir until onions turn golden, 10 to 15 minutes. Stir in spice blend, garlic, and celery. Stir until evenly coated with the spices, about 30 seconds. Add beef and pork. Ladle about 3/4 cup of the reserved potato cooking liquid into the skillet.
Step 6:
Cook and stir until meat is browned and has a very fine, paste-like texture. Continue cooking, stirring occasionally, until meat is tender and most of the liquid has evaporated, about 45 minutes. Stir in mashed potatoes. Remove from heat and cool to room temperature.
Step 7:
Line a large baking sheet with parchment paper. Place a pie plate upside-down onto the parchment. Trace the rim to make the circular area for the face.
Step 8:
Divide chilled dough into 2 pieces, one slightly larger than the other.
Step 9:
Keep the smaller piece of dough chilled while working with the large piece. Tear off dough to make the brow ridge and roll it into a thick log slightly shorter than the diameter of the circle. Place it near the top of the circle, below the forehead region. Form a pyramid with a triangular base and place it about 1 1/2 inches below the brow bone.
Step 10:
Roll 2 smaller pieces of dough into strips for the lips. Roll 2 more for the cheekbones. Form lumps for the eyes and place them above the cheekbones. Shape a small lump into the cleft above the lip. Refrigerate the rest of the dough and freeze facial features until firm, 20 to 30 minutes.
Step 11:
Shape remaining dough into a disc and roll out until 1/8 inch thick. Center the skin over the facial features. Use fingertips to carefully contour the skin to the facial features and smooth out the edges. Dip fingers in water as needed. Refrigerate for a few minutes whenever the dough gets too warm.
Step 12:
Poke nostrils into the base of the nose using a chopstick. Carve out a pupil-sized amount of dough from one eye. Draw 2 horizontal slits across the center of the other eye. Freeze face until firm enough to slide off the parchment, about 15 minutes.
Step 13:
Preheat the oven to 375 degrees F (190 degrees C).
Step 14:
Roll the smaller piece of dough into a circle large enough to line a 9-inch deep dish pie plate with a slight overhang. Fill crust with the meat mixture; smooth out the surface.
Step 15:
Remove face from the freezer and place on top of the pie. Let thaw until edges are flexible enough to shape, 10 to 15 minutes. Meanwhile, whisk egg and water together to make egg wash.
Step 16:
Press top crust lightly around the edges to seal, tucking in the edges as needed. Trim excess dough from the crust. Part lips slightly. Stick grape half into the open eye. Use trimmings to make the eyelid and socket and stick them around the grape. Cut some shallow lines into the lips. Make additional tweaks to the facial features if desired.
Step 17:
Brush entire pie with egg wash. Mix remaining egg wash with a drop of food coloring for a slightly pink hue; lightly dab over the eye sockets and cheeks. Add one big drop of food coloring to the egg wash to color the eyes, nose, and lips a deeper shade of red. Crimp the edges of the pie with a fork. Place pie dish on a baking sheet and loosely tent with aluminum foil.
Step 18:
Place in the preheated oven. Bake until well browned, about 1 hour. Place on a rack and cool to almost room temperature before serving.
Tips:
Absolutely, this technique can be used to top any pie, including all your favorite fruit varieties. When cherries are in season again, I might have to give this another go!
Think of yourself as the Bill Nye of face pie eyes—feel free to substitute cherry tomatoes for grape tomatoes if you prefer!
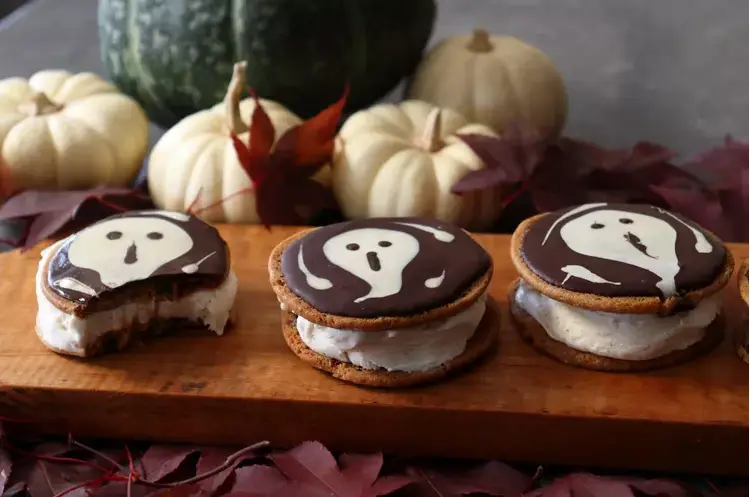
PHOTO: Photo by Chef John.
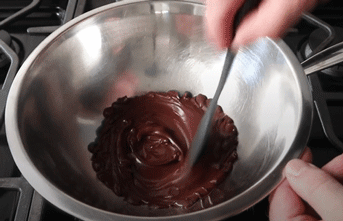
PHOTO: Photo by Chef John.

PHOTO: Photo by Chef John.
04 Chocolate "I Scream" Cookie Sandwiches
These ghost-faced ice cream sandwiches begin with classic chocolate chip cookies. "I used chocolate to create a screaming ghost design on these Halloween-themed treats, all for a fun play on words," says Chef John.
Ingredients:
8 large chocolate chip cookies
3 tablespoons melted dark chocolate
4 teaspoons melted white chocolate
½ cup vanilla ice cream
Directions:
Step 1:
Gather all ingredients.
Step 2:
Cover the flat side of 4 cookies with melted dark chocolate; tap the cookies lightly to smooth out the chocolate.
Step 3:
While still wet, use a piping bag or spoon to make a ghost shape with the white chocolate; tap lightly once more to smooth as needed. More white designs can be added to the dark chocolate background if desired.
Step 4:
Use melted dark chocolate to make the eyes and screaming mouth; tap or shake once more to even and smooth out.
Step 5:
Let chocolate cool until hard and dry to the touch, at least 1 hour.
Step 6:
Scoop ice cream on 4 remaining cookies, and cover with the tops. Carefully press to flatten, and transfer to a freezer to freeze thoroughly before serving.
Step 7:
Serve and enjoy!
Tips:
Make sure the white and dark chocolate are melted at the same time for decorating.
If you fuss around with these and they start to cool or harden, pop them into a warm oven for a few seconds for the chocolate to soften up again.
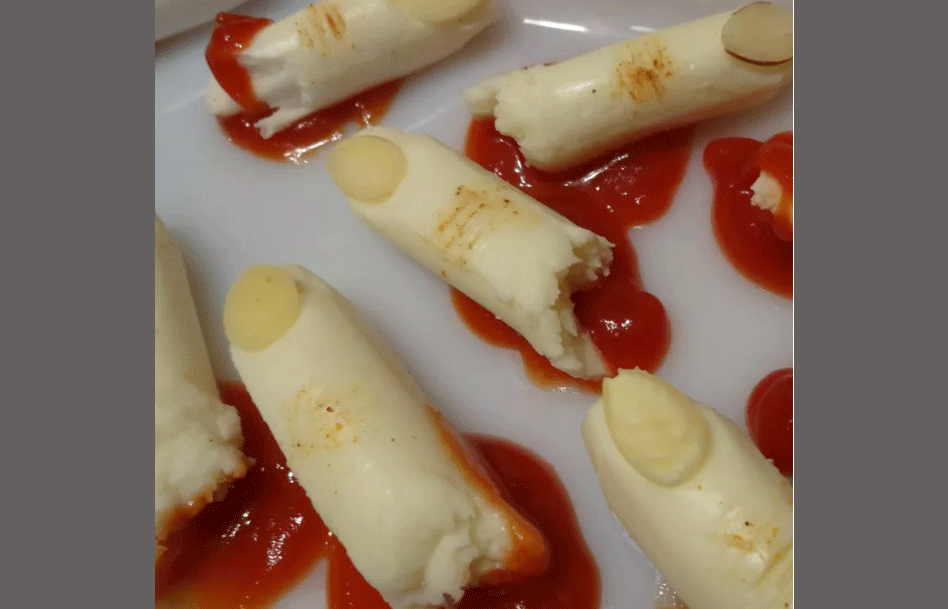
PHOTO: Photo by Chef John.
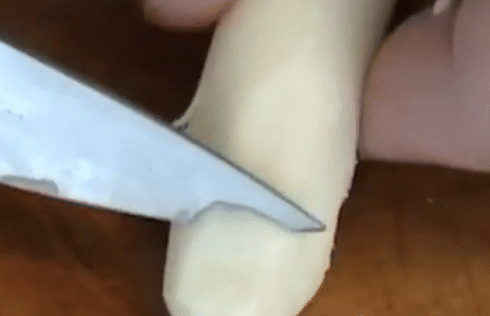
PHOTO: Photo by Chef John.
05 Severed-Finger Cheese Sticks
These spine-chilling Halloween party appetizers resemble severed fingers but are actually delicious string cheese sticks! With string cheese for the fingers, almonds for the nails, and a dash of hot sauce for that ghoulish touch, they’re sure to delight your guests.
Ingredients:
6 string cheese sticks
12 almond slices
2 tablespoons hot pepper sauce, or to taste
Directions:
Step 1:
Round off the ends of each cheese stick with a paring knife to resemble a fingertip. Roughly tear each cheese stick in half to form two torn-off "fingers".
Step 2:
Shave off a piece of each cheese "fingertip" to form a nail bed; place an almond slice on the "nail bed" to form a "fingernail".
Step 3:
Cut a few shallow lines in center of each "finger" to form knuckle marks.
Step 4:
Pour several drops of hot sauce into small pools of "blood" on a serving plate. Dip torn ends of the cheese fingers into "blood" to resemble bloody fingers. Lay each "finger" in its own pool of "blood".
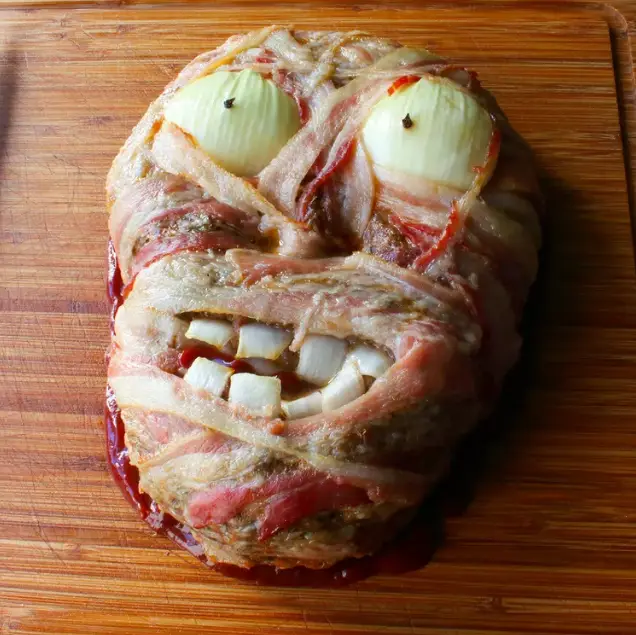
PHOTO: Photo by Chef John.
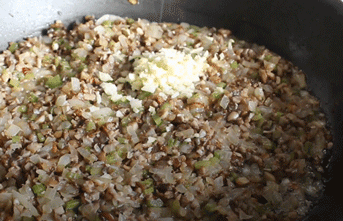
PHOTO: Photo by Chef John.

PHOTO: Photo by Chef John.
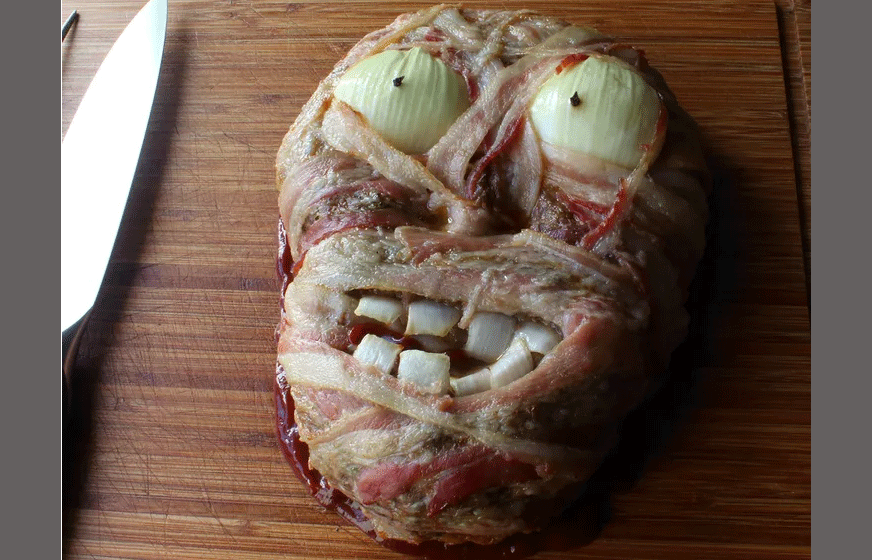
06 Chef John's Zombie Meatloaf
Introducing zombie meatloaf: the loaf that truly alarms! "To be honest, 'appetizing' isn't exactly the goal here," Chef John admits. "But if we're going for a fun, gimmicky holiday recipe, it should definitely taste great—and this one absolutely does. I was really pleased with how it turned out. And don’t skip the mushrooms; they add tons of flavor and help keep the meat moist and tender!"
Ingredients:
½ cup unsalted butter
1 ½ cups diced yellow onion
½ cup diced celery
1 (8 ounce) package brown mushrooms, finely chopped
1 tablespoon kosher salt, divided
3 cloves minced garlic
1 teaspoon freshly ground black pepper
½ teaspoon dried thyme
¼ teaspoon cayenne pepper
3 pounds lean ground beef
¾ cup plain dry bread crumbs
1 egg, beaten
3 tablespoons buttermilk
2 tablespoons ketchup
1 tablespoon Worcestershire sauce
1 onion
2 whole cloves
1 pound bacon strips
Blood Sauce:
¼ cup barbeque sauce
¼ cup ketchup
1 dash hot sauce, or to taste
Directions:
Step 1:
Preheat oven to 325 degrees F (165 degrees C). Line a baking sheet with parchment paper.
Step 2:
Melt butter in a pan over medium-high heat. Saute diced onion, celery, mushrooms, and 1 teaspoon salt until the mixture dries out and starts to turn golden brown, 5 to 7 minutes. Stir in garlic, black pepper, thyme, and cayenne pepper. Remove from heat and let cool to room temperature, about 10 minutes.
Step 3:
Combine remaining 2 teaspoons salt, ground beef, bread crumbs, egg, buttermilk, 2 tablespoons ketchup, and Worcestershire sauce in a large bowl. Add cooled vegetable mixture. Mix with your hands until thoroughly combined. Cover with plastic wrap and place in the refrigerator.
Step 4:
Slice 2 round sides, about 1/2-inch-thick, off the second onion for the zombie eyes. Push 1 clove into the center of each slice. Cut a 1-inch-wide section off the remaining onion and dice into chunks to form zombie teeth.
Step 5:
Transfer meatloaf mixture to the prepared baking sheet and use damp hands to shape into a zombie skull shape that is 3 to 4 inches tall. Form indents to represent the eyes, nose, and mouth. Drape bacon over the face, covering most of the meatloaf. Add onion eyes and teeth. Tuck in loose ends of bacon under the sides with a spatula. Cover the onion eyes with aluminum foil to prevent browning.
Step 6:
Bake in the preheated oven until the meatloaf reaches an internal temperature of 155 degrees F (68 degrees C), about 1 hour.
Step 7:
Stir barbeque sauce, 1/4 cup ketchup, and hot sauce together in a bowl to make the blood sauce.
Tips:
For crispier bacon, cover the eyes and teeth with aluminum foil and broil until the bacon is browned and crispy.
If you prefer, you can use milk instead of buttermilk.
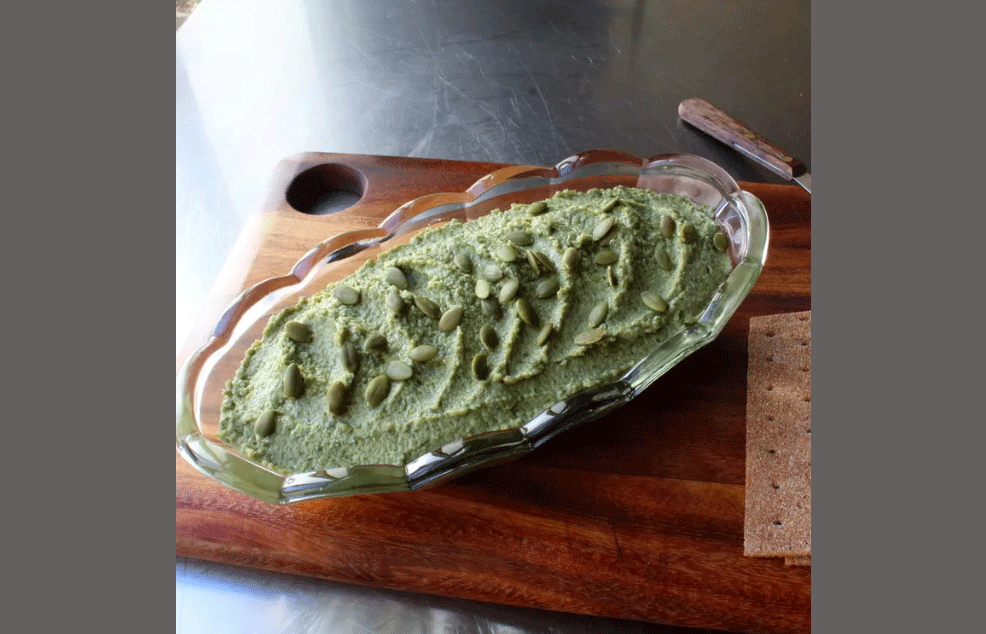
PHOTO: Photo by Chef John.

PHOTO: Photo by Chef John.
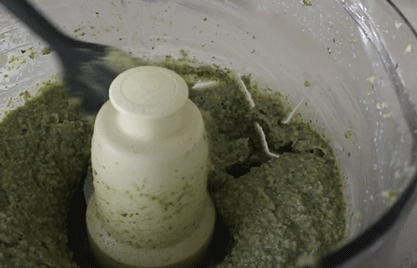
PHOTO: Photo by Chef John.
07 Pumpkin Seed Spread
After the zombie meatloaf, let’s dial back the spookiness a bit. Chef John's pumpkin seed spread "straddles the line between sweet and savory, making it incredibly versatile," he explains.
Ingredients:
½ cup vegetable oil
8 peeled garlic cloves, halved or quartered depending on size
2 cups green (hulled) pumpkin seeds
½ cup diced onion
2 tablespoons diced green serrano or jalapeno chilies
¾ cup apple juice
2 limes, juiced
1 cup fresh cilantro leaves
1 teaspoon salt, plus more to taste
½ cup apple juice or water, to adjust texture of spread
2 teaspoons apple cider vinegar (Optional)
Directions:
Step 1:
Place garlic pieces in a cold, dry skillet. Add vegetable oil. Cook garlic on low heat until it starts to soften but does not get brown, about 8 to 10 minutes, stirring occasionally. When garlic is tender, remove skillet from heat; let garlic cool in the oil.
Step 2:
Place pumpkin seeds in a cold, dry skillet. Set heat to medium. Stir seeds until hot and fragrant but not browned, 3 to 5 minutes. Remove from heat. Transfer to a bowl.
Step 3:
Heat vegetable oil in a skillet over high heat. Add onion and Serrano pepper. Cool until edges start to brown and some bits begin to char, 3 to 5 minutes. Pour in apple juice. Reduce heat to medium and cook until liquid is reduced almost all the way and has a syrup-like consistency, about 5 minutes. Remove from heat.
Step 4:
Place pumpkin seeds, cilantro leaves, onion mixture, softened garlic and oil, lime juice, and salt in the bowl of a food processor. Cover and pulse on and off until mixture becomes a coarse paste, scraping down sides with a spatula a few times, 1 or 2 minutes. If mixture is quite thick, add a few tablespoons of apple juice or water (apple juice will make it sweeter).
Step 5:
Continue to process until mixture is to your desired consistency. Transfer to a bowl. Cover; refrigerate until chilled, about 2 hours. Taste, and adjust seasonings and acidity as needed with additional salt and/or apple cider vinegar.
Tips:
You can also modify the texture and acidity by adding a splash of apple cider vinegar.

PHOTO: Photo by Chef John.
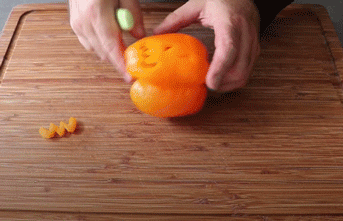
PHOTO: Photo by Chef John.
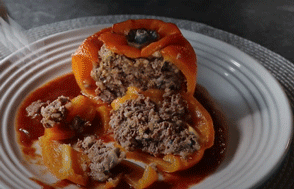
PHOTO: Photo by Chef John.
08 Jack-o'-Lantern Stuffed Peppers
Chef John turns orange bell peppers into a fun, Halloween-themed dinner with this easy, kid-friendly stuffed pepper recipe.
Ingredients:
1 teaspoon olive oil
4 large orange bell peppers
1 pound ground beef
2 teaspoons kosher salt
½ teaspoon ground black pepper
3 pinches cayenne pepper, or to taste
1 teaspoon Worcestershire Sauce
3 cloves garlic, minced
⅓ cup thinly sliced green onions
2 tablespoons salted butter, melted
2 tablespoons ketchup
1 cup grated sharp Cheddar cheese
1 cup cooked rice
2 cups seasoned tomato sauce, warmed
Directions:
Step 1:
Gather all ingredients. Preheat the oven to 400 degrees F (200 degrees C), and oil a baking dish with olive oil.
Step 2:
Use a small knife to cut eyes, nose, and mouth into the flattest side of each pepper, just like a jack-o'-lantern. Cut around the seedpods and remove the tops, trimming and discarding any seeds from under the stems. Trim the white membrane from the inside of each pepper and shake out any seeds. Place in the prepared baking dish.
Step 3:
Mix together ground beef, salt, pepper, cayenne, Worcestershire sauce, garlic, green onions, melted butter, ketchup, Cheddar cheese, and rice in a bowl until well combined.
Step 4:
Stuff mixture evenly into peppers and cover with the pepper tops.
Step 5:
Wrap the baking dish loosely with foil and place on a sheet pan, and bake in the upper center of the preheated oven for 1 hour.
Step 6:
Remove the foil and continue baking until peppers are tender and ground beef is cooked through, 10 to 15 more minutes.
Step 7:
Place stuffed peppers on a few tablespoons of warm tomato sauce. Serve immediately with more sauce on the side.
Step 8:
Serve and enjoy!
Tips:
Feel free to use your favorite stuffed pepper filling or even a meatloaf recipe for this dish!
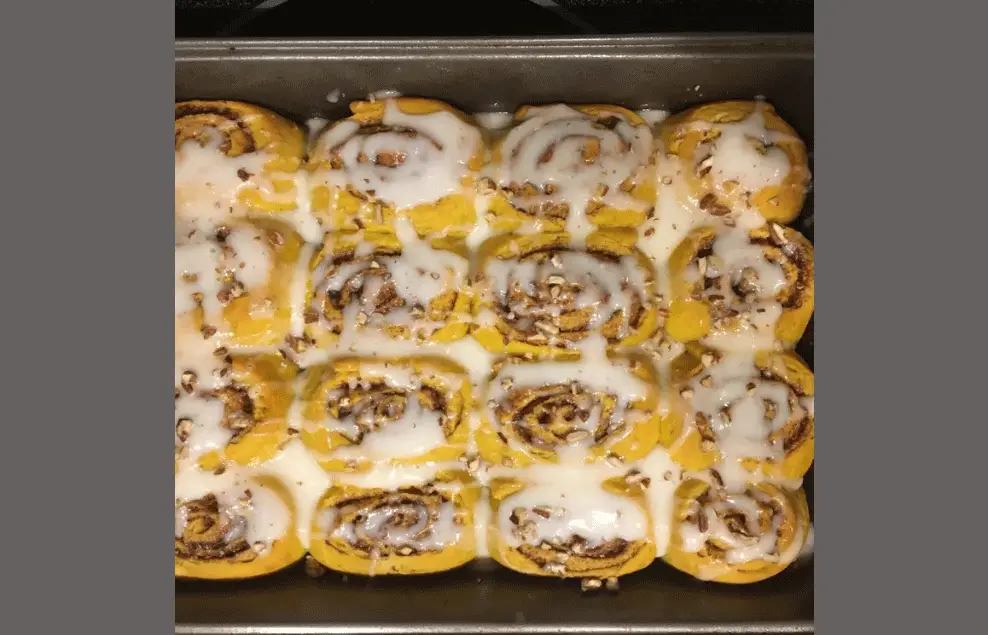
PHOTO: Photo by Chef John.

PHOTO: Photo by Chef John.
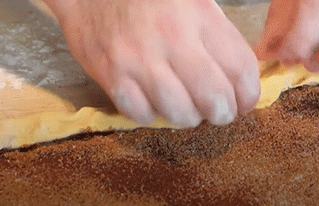
PHOTO: Photo by Chef John.
09 Chef John's Pumpkin Cinnamon Rolls
As Chef John puts it, the pumpkin cinnamon rolls are "the least scary Halloween treat ever! But what they lack in spookiness, they more than make up for in sheer deliciousness. They’re the best cinnamon rolls I've ever tasted," he raves. "One crucial tip is to achieve a nice soft, sticky dough. Be sure to add just enough flour so that the dough barely pulls away from the sides of the bowl while kneading."
Ingredients:
¾ cup packed brown sugar
¼ cup white sugar
2 tablespoons ground cinnamon
1 (.25 ounce) package active dry yeast
½ teaspoon white sugar
¼ cup warm water (100 to 105 degrees F/38 to 41 degrees C)
½ cup pumpkin puree
¼ cup heavy cream
¼ cup white sugar
¼ cup butter, melted
1 teaspoon salt
½ teaspoon vanilla extract (Optional)
½ teaspoon ground ginger
¼ teaspoon ground allspice
2 cups all-purpose flour
1 egg
2 ¼ cups all-purpose flour, or as needed
1 teaspoon vegetable oil
5 tablespoons butter, melted
¼ cup cream cheese, softened
1 cup confectioners' sugar
¼ cup milk, or as needed
¼ teaspoon vanilla extract (Optional)
¼ cup toasted pumpkin seeds, to garnish
Directions:
Step 1:
Mix brown sugar, 1/4 cup white sugar, and cinnamon together in a small bowl; set aside.
Step 2:
Combine yeast, 1/2 teaspoon white sugar, and warm water in the bowl of a stand mixer. Whisk together and set aside until foamy, about 10 minutes.
Step 3:
Pour pumpkin puree, cream, 1/4 cup white sugar, 1/4 cup melted butter, salt, 1/2 teaspoon vanilla, ginger, allspice, 2 cups flour, and the egg into stand mixer bowl with the yeast mixture. Mix with dough hook attachment until combined, about 2 minutes.
Step 4:
Stir in 2 1/4 cups flour and mix on low with the dough hook, adding more flour if the mixture is too sticky, until dough is slightly sticky, smooth, and elastic, 6 to 7 minutes.
Step 5:
Remove dough and shape into a ball. Coat the bowl of the stand mixer lightly with vegetable oil, return dough to the bowl, turning to coat with oil. Cover with aluminum foil and set aside in a warm place to rise until doubled in size, about 1 1/2 hours.
Step 6:
Generously butter a 13x9-inch baking dish.
Step 7:
Transfer dough to a well-floured work surface. Use your hands to flatten into a rectangular shape about 1-inch thick. Generously sprinkle flour over both sides of the dough; roll out to about a 20x12-inch rectangle. Pour melted butter over the top and brush evenly over the surface, leaving 2-inches along one wide edge unbuttered. Sprinkle the brown sugar mixture over the dough and moisten the unbuttered edge with water. Starting at the wide edge with butter, roll dough tightly into a log; press firmly along moistened edge to seal.
Step 8:
Trim uneven ends from the roll and discard. Cut rolled dough into 16 equally-sized pinwheels. Place the pinwheels, cut side up, in the prepared baking dish. Cover with plastic wrap and set aside in a warm place to rise until doubled in size, 45 to 60 minutes.
Step 9:
Preheat oven to 350 degrees F (175 degrees C).
Step 10:
Bake in the preheated oven until golden brown, about 30 minutes; set aside to cool slightly while mixing glaze.
Step 11:
Whisk cream cheese, confectioners' sugar, milk, and vanilla extract together in a large bowl until smooth; drizzle over the warm cinnamon rolls. Sprinkle pumpkin seeds over the rolls to serve.
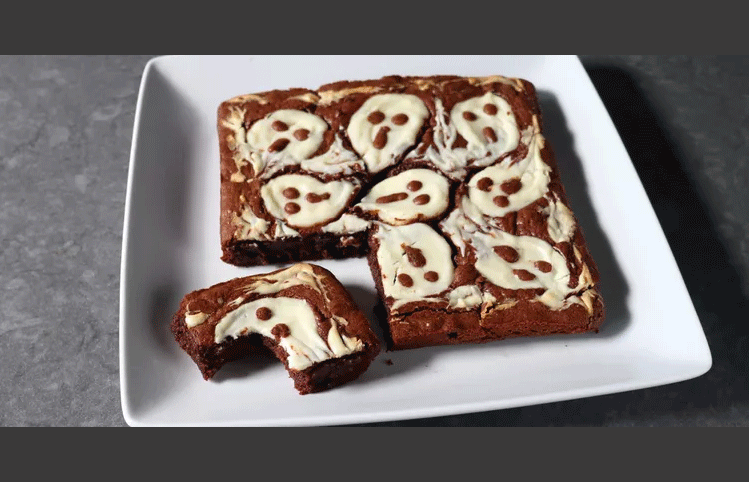
PHOTO: Photo by Chef John.
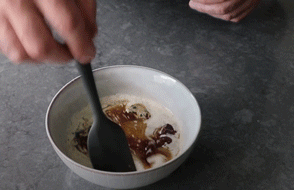
PHOTO: Photo by Chef John.
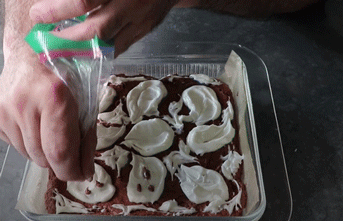
PHOTO: Photo by Chef John.
10 Ghost Cheesecake Brownies
There’s no way to improve Chef John’s fudgy chocolate brownies—unless you swirl some cheesecake batter on top before baking! The spookiest part about these brownies might just be how quickly they vanish.
Ingredients:
Chocolate Brownies:
3 ounces dark chocolate, chopped
½ cup unsalted butter, melted
2 large eggs
1 ¼ cups granulated sugar
1 teaspoon vanilla extract
¾ teaspoon kosher salt
⅔ cup all-purpose flour
Cheesecake Ghosts:
½ (8 ounce) package cream cheese, softened
2 tablespoons white sugar
1 large egg white
¼ teaspoon vanilla extract
Directions:
Step 1:
Gather all ingredients. Grease an 8x8 baking dish and line with parchment paper.
Step 2:
Place chopped chocolate into a heatproof bowl. Melt butter in a sauce pan over medium heat and pour over chocolate. Let sit for 5 minutes until chocolate starts to melt. Mix well until chocolate has completely melted.
Step 3:
Combine eggs and sugar in a bowl and mix with an electric mixer on high speed until light and pale yellow in color. Add vanilla extract and salt. Continue mixing on high for 1 minute.
Step 4:
Transfer in chocolate-butter mixture and mix until well combined for 30 seconds. Fold in flour with a spatula until flour has disappeared. Set aside 2 teaspoons of brownie batter.
Step 5:
Transfer remaining batter into the baking dish and distribute evenly. Smooth out the top with a spatula.
Step 6:
For the cheesecake ghosts combine softened cream cheese, sugar, egg white, and vanilla extract in a bowl. Whisk until mixture is well combined.
Step 7:
Set 9 tablespoons of cheesecake dollops onto the brownie batter in an even pattern. Spread out dollops into ghost-like shapes with a spoon and a bamboo skewer.
Step 8:
Transfer reserved brownie batter into a small plastic bag, snip off one corner, and pipe 2 eyes and a mouth onto each cheesecake ghost. Preheat the oven to 350 degrees F (175 degrees C).
Step 9:
Bake brownies in the center of the oven until edges are lightly golden brown and the center is just set, 35 to 40 minutes. Because these are very fudgy, chewy style brownies, a toothpick will not come out clean, so that's not a reliable test for this recipe.
Step 10:
Allow brownies to cool completely in the pan before transferring them to a plate and cutting them into squares.
Step 11:
Serve and enjoy.
Tips:
Be sure to use unsweetened chocolate for the best results.
The cheesecake ghost part of the recipe yields a few extra tablespoons. You can swirl this into the bottom of the brownie pan or simply dollop it on top wherever there's space.

PHOTO: Photo by Chef John.
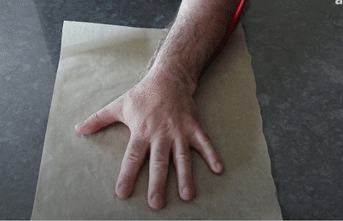
PHOTO: Photo by Chef John.
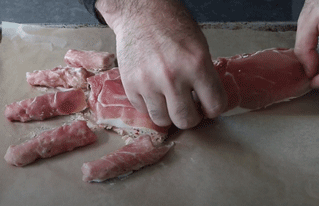
PHOTO: Photo by Chef John.
11 “Horrible Hand” Ham and Cheese Board
How spooky this turns out depends on your sculpting skills! Fortunately, "the cheese spread is easy to make and can be customized in countless ways. Plus, the prosciutto 'flesh' requires only a few ounces of meat, making it budget-friendly," Chef John explains. "This pairs wonderfully with any type of bread or crackers, but the black sesame crisps were just perfect."
Ingredients:
1 1/2 pounds cream cheese, softened
1/3 cup finely chopped roasted red pepper
2 tablespoons chopped fresh Italian parsley
1/2 teaspoon greshly ground black pepper
1/4 teaspoon garlic powder
1/4 teaspoon salt
1 pinch cayenne pepper
For the Board:
6 ounces thinly sliced prosciutto, or other cured ham
crackers or bread to serve
Directions:
Step 1:
Add cream cheese, red pepper, parsley, black pepper, garlic powder, salt, and cayenne to a bowl and mix thoroughly. Cover surface with plastic wrap, and chill until firm, about 30 minutes.
Step 2:
Trace your hand on a piece of parchment. Turn parchment over, and place on a baking sheet.
Step 3:
Use two teaspoons to fill in the hand template with the chilled cheese mixture. Build cheese up in appropriate spots to form the 3-dimensional shape of a hand and wrist.
Step 4:
Cover with plastic wrap and freeze until very firm, about 1 hour.
Step 5:
Use a knife to separate fingers from hand and hand from wrist. Wrap each piece with prosciutto, tucking extra meat underneath. Cover, and place in freezer about 1 hour, or until ready to complete assembling the hand.
Step 6:
Place the hand section on a serving board first, then attach the fingers and the wrist. Use your own hand as a reference for placing parts of the hand. Use more prosciutto to cover seams, and to add detail and definition. Refrigerate until ready to serve.